Thursday, October 25, 2012

Halloween Costumes 2012: DIY Luke and Leia


We are a family of nerds and we are raising our kids on the same path.  They both love Star Wars (among other nerdy entertainment) and it was not hard to convince them to  be Luke and Leia for Halloween.  My main criteria for Halloween is that they cannot be a ghoul or "evil" thing but can be any other character from a movie or book or history.  Also, if I have to make it I try to push them towards something more simple or something I know I can handle.

Making Luke

Image Source

Given that my boy is 2 and a quarter years old, I didn't think complete authenticity was going to be a big concern.  He is more of a big picture sort of guy :).  I thought that making it all wouldn't be too hard but on the off chance I might find a karate gi, I went to the Goodwill and looked around.  I was quickly greeted by a white karate top that was a size too big but only $3.  I shortened the sleeves a little and it fit great.  I had an old cream colored pillowcase that wasn't getting used and made a pair of pants out of it.   This was done by folding a pair of my son's pants in have at the crotch and tracing the outline on some paper.  I then laid the pattern on the fold of the fabric and cut out 2 pieces then sewed them together.  I added some elastic at the waist and didn't even hem the legs because they would be shoved into the boots.  For the boots I had planned to make boot covers like the ones shown above. Instead I opted to use my daughter's old brown "ugg" style boots and they worked fine.  I bought a little brown pleather and cut the right size for a belt and added a little Velcro to close it.  We already had a couple light sabers so that was set and I let his hair grow out just to let him have that shaggy 70's Luke hair.


Making Leia


It is always more complicated making girl clothes.  For one, they notice detail and you can't get away with faking something as easily. Also Leia isn't a simple outfit, it is a drapey dress with a mock turtleneck,  hood and belt so you can't just pick that  up at the Goodwill.  My niece also wanted to be Leia and she is 10 months older than my daughter.  My mom and I collaborated to figure out how to make the dress without a pattern.  She had a bolt of white stretchy knit from an estate sale that she got for $5 a while back with the thought that "I can make something out of  this."  Well the opportunity presented itself.

I found a tutorial HERE for an adult size Leia costume and used that as the starting point.  As you can see below the tutorial called for cutting the fabric out of once piece of material.  It makes a kind of "snow angel" shaped cut out.  We used an old sheet to do the first cut out then laid that on the main fabric to make the dress cut out.  We made it roomy because it has some drape and because the belt would allow for some adjustments.


The sewing was just 2 seams up the sides for the main dress part.  Because the fabric doesn't fray, we didn't bother to hem the sleeve ends or the bottom of the dress (so much easier).  Without a collar and the hood the dress easily fit over the girls heads because of the stretch.  The collar was just a rectangle of fabric with a bit of lightweight interfacing sandwiched inside.  The hood was a rectangle of fabic sewn up the back and gathered to fit the neck (shoulder to shoulder).  After the collar and hood were attached we added 2 hook and eye closures to the neck.  Then we found out a bit about construction.  The neck that easily slipped onto the girls without the collar/hood combo would not fit over their heads with it.  Ahhh the fun of pattern-less sewing.  So we were lucky that the back of the dress was now hidden by the hood and we cut a small slit in the neckline to allow to their noggins to get through.  Problem solved and only the people who read this post will know about it. :)

The belt was more white fabric (not stretchy but a soft polyester remnant we picked up.)   I made a pattern using my daughters waist as a guide for the height and width of the belt.  I allowed for 1/2 an inch seam allowance and had the belt itself only go around to the sides of the girls.  Inside I used heavy interfacing to give it more structure.  After the belt was done and sewn, I added some sport elastic (about 1 1/4 inch wide) to the back to make it easy to pull on and off without a closure.  The front design on the actual belt was metal and I was not going to go that far with it.  We found some silver sheets of duct tape (I had no idea they came in sheets until we found the stuff at Jo-Ann's) and I cut out the front pentagon and side octagons with little circles in the middle of each.  They stuck really well to the fabric and will be fine for costume/dress up purposes as long as the kids don't experiment with peeling them off.

My daughter is a brunette so the hair color wasn't as issue.  However the MASSIVE amount of hair in Leia's cinnamon bum's was not going to work.  I had some toddler size brown socks and cut off the toes.  I rolled them into donut shapes and used them to make 2 sock buns on the sides of her head after making pig tails at the top her her ears.  A lot of pins and hair spray later and we have a Leia-ish hair do.  


Under the dress I had my daughter wear some white knit pants and an undershirt and she just wore her athletic shoes so walking would be easy while trick or treating. (which we do downtown during the day more than worrying about dong it at night when bedtime is upon us.)

Tuesday, October 23, 2012

Evil Food Craving: Navajo Fry Bread


This is so easy and yummy and that is what makes it evil.  I had this in high school when we used to go to missions trips to the Navajo Nation and do a VBS week with the children there.  There was a trailer on the land where we stayed and in it older women would make food and sell it daily.  The Fry Bread was awesome especially when it was fresh out of the pan.  This bread can be a side dish.  It can also be used as a tortilla for Navajo tacos (drooling already.)  People also put powdered sugar or honey on it for a sweet snack.

Here is the recipe.  It makes 4-5 small 6 inch or so bread rounds.

1 cup flour
1/4 tsp salt
1 tsp powdered milk
1 tsp baking powder
1/2 cup water
oil for frying (I use canola but the Navajo would most likely use shortening)
extra flour for your hands

1) mix all the ingredients in a medium sized bowl.  While you are prepping put about 1 inch of oil in a skillet.  I just use my 10 inch pan but a cast iron one would be good.

2) Separate the dough into 4-5 balls.  I like doing 5 because I make the kids slightly smaller and have an extra to nibble on :).

3) flouring your hands, work the ball (not kneading it) into a flat-ish circle about the size of your hand fingers to palm.  Its kind of like a pizza dough so stretch press and turn it to get it to the size you want.  Make sure there is at least 1 small hole in the center somewhere (about an inch or so) this helps it not puff up and the oil gets to the top side.

4) Check your oil and see if its hot enough.  I don't use a thermometer I just see if it sizzles when I drop a little bit of dough in.  Place your dough in carefully and let it cook for about a minute on each side until it is a nice golden color.

5) Place on a paper towel and sprinkle with some salt.  These are best when you eat them right away but are still good it they are made ahead and served with the meal.

Monday, August 13, 2012

Evil Craving Food Series: Peanut Butter Pie


peanut butter pie

or Peanut Butter Cheesecake

1 premade cookie crust or graham cracker crust

1 c. creamy peanut butter
1 c. sugar
1 (8 oz) pkg cream cheese at room temp.
1 tbsp vanilla
3/4  c. whipping cream (I used extra creamy cool 
whip.


Beat peanut 
butter, sugar, cream cheese, 2 tbsp 
butter and vanilla in a large bowl until smooth 
and creamy. 
Beat cream until soft peaks form. Fold in 
whipping cream into peanut butter mixture. 
Spoon into crust. Refrigerate 6 hours. Add extra 
whipped topping if you want. Other options are 
chocolate sauce drizzled on it or chocolate chips 
either on top or in it. :)

Thursday, June 7, 2012

"Soilove" love

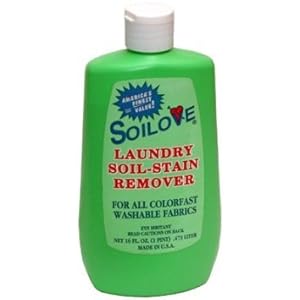
Soilove Laundry Soil-stain Remover New
I have previously mentioned that Soilove is awesome.  But I had an experience this week that has made me love this more.

Have you ever had that moment when you hear something clicking in the dryer only to investigate and find the chapstick or lipbalm you left in your pocket?  Well if you have, you know the sinking feeling you get as you check through the clothes and find which have been damaged by the pure, lip softening oils that have been melted and tumbled through the load.

I had several items of clothing with smatterings of Burts Bee's Pomegranate Lip Balm on them (it has the added fun of a pink hue so it stands out more than just a clear chapstick.)  I was sooooo bummed.

I went online and read how to get it out and there were many suggestions involving Dawn or solvents.  I did not have any Dawn left and then I thought of Soilove (which definitely has a solvent smell to it.) I put it on all the spots I could see and rewashed.  Things had improved, but were still visible so I reapplied the stain remover and washed again and after that load I couldn't see any spots.

Due to my stress and panic I didn't think to take pictures, but I was seriously excited and relieved when those spots were gone.  I have also used this on other stains with success (berries on light clothing for example.)  It is sold several places, but your best bet is the 99 cent store where a bottle is 99 cents as opposed to 1-3 dollars in other stores or even more online.

I still don't know what's in it but it says it can "Safely remove blood, grease, ink, beverage stains, food, grass, perspiration and most other stains. For all colorfast fabrics."  I might have to ditch the expensive stain fighters and stick with this stuff. :)

***Edited to add: I did notice that I had either missed spots or some were too bad to fix and there were some items of clothing lost to the evil lip balm, but I still stand by that it gets out baby poop like magic (the only other thing I found that works really well is sitting it in the sun after I wash it to bleach/dry)

Friday, May 25, 2012

Eating out with kids...successes and failures.

1.) chick-fil-a

SUCCESS!:  The most simple explanation is that most kids love chicken.  Chick-fil-a has chicken pieces (as opposed to nuggets) which makes the food at least identifiable as a real meat.  The service is always friendly and helpful.  They have free placemats which ROCKS!!! The decor is fun and family friendly and there is a play structure inside (I have yet to be brave enough to let my kids venture into these though.)  The have regular family nights with crafts and activities that are really cute and fun.

Cons: They are closed Sundays (which for us might be prime time to be able to head over there).  The food is more expensive than other fast food, but I always attribute this to the fact that it is actual food so you pay for the quality of what you are eating and the service they provide.

Similar options: Farmer Boy's, Subway, Baja Fresh,

2.) 

SUCCESS!: Red Robin has been a place we have enjoyed several times out with family.  They have the basic crayons and color on menu which is always helpful.  What is good is the atmosphere.  There are fun posters everywhere and things to look at (for my kids age 2 and 4, it is really easy to get them interested in searching the walls for funny things.)  The food is kid friendly (burgers, pizza, chicken fingers, etc.) and they have substitutes for fries so they aren't eating a huge amount of fatty food.  The restaurant itself is not quiet so the giggles and games kids get into will not be an issue to the other diners.  The service is usually good and friendly. This is about as close to a real restaurant as we have had success with.
-
Cons: The only one I can think of is that the wait for food is often longer than "fast food".   I think it would be a great idea to have your selections for kids picked out first and order that with the drinks while everyone else decides.  Better yet, go online and pick your food (have everyone with you do this) so you can eliminate the 10-15 minute menu gazing session.  This will help the whole thing go faster and you can get the kids walking around outside to get out all the energy they saved from sitting. :)

Similar options: Outback, Applebee's, Chili's, Claim Jumper's,

OTHER SUCCESSES:

*Denny's has always been quick and easy (albeit unhealthy lol) but if you gotta go out and are panicking about it, Denny's is a good start.

*Local family restaurants and diners.  We have one Mexican restaurant that we have gone to since I was a kid.  It is casual and serves quesadillas (which again, most kids love) and you don't have to tip because you aren't waited on (sort of like other fast food places where you get your drinks and stick a number on your table for food.) So those places are great. Think fast service and uncomplicated food choices.

*Starbucks can work for short sit downs and if you grab a good spot. It also helps to have a grandpa along to run around with the kids outside when they get antsy (as my dad often does after church.) I also pack a lunch and have them eat there while we enjoy our drinks.

*Ikea.  Weird I know, but there is a lot there that is super kid friendly.  If its a rainyday and you want to get out have them play pretend house in Ikea for awhile then head to the restaurant where you can get them a meal for under $3.  A hot dog or a slice of pizza at the exit bistro is even less.

*Beni Hana type restaurant.  This is like a show and food at the same time.  Though expensive the food is cooked right in front of you and served right away.  I wouldn't suggest it for a kid under 2 unless they are really well behaved and can focus on that type of thing but if you have a kid that will be into the spectacle, you might have a fun nice dinner with the family for a "special occasion."

*Outback,

FAILURES: Oh so many....

*Any place that is even slightly for grown ups DOES NOT WORK.  If you can't hear people talking and chatting when you walk in (meaning that the noise level is buzzing and there isn't likely to be serious dates or anything going on) I would turn around and  walk out.

*Any place that takes longer than 10 minutes to seat you at a table DOES NOT WORK.  If reservations are needed, DO IT.  Also the best times to head out to a restaurant seems to be late afternoon/early evening. 4:00-5:30ish.  Beat the dinner rush and you won't have to wait long for seating or food.

*Any place with unfamiliar food should be avoided until they are more mature.

*Any place with cloth napkins (unless you have a nice little girl who will go to a cute tea restaurant for an hour...that is an exception.) :)

WHEN IN DOUBT: Order the food and take it to a local park or even home for a treat.  This is awesome with so many places offering to go options and then you don't feel weird about splitting up entrees to share with the kids and you save on tip. :)

SEE THIS BLOG FOR A REAL AND FUNNY ILLUSTRATION OF EATING OUT WITH KIDS>

Friday, March 9, 2012

Model Home Idea: Light and Neutral Couches

I know they want to make the spaces as bright and large looking as possible.  One way they seem to do this is with their choice of furniture colors.  The white and creams they use scare me because of having kids, but I also would REALLY love a light colored couch...maybe when the kids are grown. :)


I really love that each room has a different feel and style but it could easily be changed by making new pillows and changing out the artwork around the room.  Also, I blame the kids, but the grown ups in our house can be just as messy sometimes so we would need a lot more rules about how we treat our furniture if we ever switched to a light sofa.

Simple Party Cake


Using the same technique as I did with the cupcakes, I made a 2 layer birthday cake.  It is pretty forgiving and could be used for a shower or other celebration as well.

Tuesday, February 28, 2012

Party Cupcakes

I made some cupcakes for my mother in law's birthday party this weekend.  I used the modification for 'The Perfect Cupcake Recipe (using a mix)"  and made a quick Marshmallow Buttercream Frosting. (For the frosting I used less butter in the mix but only 1.5 sticks rather than 2 whole sticks. I wouldn't go much less than that because it will change the consistency.)

After making a ridiculous mistake (not adding water) my cupcakes turned out disastrous.  The lesson: Don't bake while distracted by children.

Thanks to my brother running to the store for some replacement ingredients I was able to make another batch and they were really good.

After the cupcakes were cooled, I piped on the frosting using a 1M star tip and by starting in the middle and swirling it outward you get a flower/rose look to your frosting.  You can find some good general cupcake decorating tutorials HERE.

Wednesday, February 1, 2012

Rainbow Cookies


In my daughter's Cubbie (AWANA) workbook, the verse for the week was "All Your words are true...". The story focused on God keeping His promises and the story of Noah's Ark.  The rainbow at the end of the story represents God keeping his promise to Noah.

The workbook has suggested activities for home study/practice and this week's was making rainbow cookies.  There were no instructions but I figured it couldn't be that hard.

I made a basic sugar cookie recipe. I also didn't have the forethought to take pictures of the process but it was pretty simple.

SUGAR COOKIES

1/2 cup butter (softened)
1 cup sugar
1 egg
1 tsp baking powder
1 3/4 cups flour
1 tbsp milk
1/2 tsp vanilla
1/4 tsp salt

mix the wet (butter sugar, egg, vanilla) then mix in the dry ingredients.

At this point, I separated the dough into 6 small bowls and used the basic 4 pack of food coloring to make the colors. I would suggest adding a bit more to red and a little less to the purple bowl.

For red =8-10 drops of red food coloring
For orange +6 yellow 2-3 drops of red
For yellow = 8-10 drops of yellow
For green = 8 drops green
For blue = 8-10 drops blue
For purple = 6 drops red 2-3 drops blue

(adjust for desired colors orange and yellow are pretty similar so make the orange darker so the baked version shows contrast)

Flour a board and lay out a sheet of plastic wrap on a flat surface or baking sheet ready for the rolled out dough.  I started with red and found that it was much easier to shape using my hands than using a rolling pin but go ahead and do what works for you.  I shaped the red into an oblong shape about 8 inches by 4 inches.  The goal is more for the depth of about 1/4 of an inch.  I repeated with orange, yellow, green, blue and purple layering each on top of the other on the plastic wrap.  Then I rolled all the colors into a log shape so the red was surrounding the outside of all the colors, and wrapped it in the plastic wrap then let it sit in the refrigerator for 1.5-2 hours.

When ready, preheat the oven to 375 degrees F.   Unwrap the log and cut into 1/4 inch-1/2 inch slices and lay out on a cookie sheet leaving about 1.5-2 inches between.  Cook for 12-15 minutes.  makes 18-24 cookies depending on size.


Saturday, January 28, 2012

Model Home #2

This is in the same development but is much more modern in styling.  In the entrance/TV lounge I really liked the clear acrylic coffee table.  I'm usually not into modern stuff but I liked how uncluttered it looked.  It may not be practical with kids but in a living room or a more adult room it would work well. A similar look can be found HERE.

This bright color is not something I would probably do in my house.  I'm not brave enough yet.  It is really fun though.  I also like that they color coordinated all the books on the bottom shelf.  How nice it would be to have books be decorative instead of just crammed in every inch (as mine are.) A similar bookcase can be found HERE in a clover green.


I LOVED this kitchen.  It was so spacious and light.  I could fit my living room and kitchen into this space easily.


The dining chairs didn't look very comfortable but they did look "cool."  They look like Eames chairs or some sort or reproduction/inspiration of one. I wish I would have tried to sit on one though.  I imagine after a dinner or a game night your bottom might look pretty weird.


I really liked these candle holders and the clean white table.  Again, not sure how crazy it would make me with kids and spaghetti spilling on it but its a lovely thought. :)


I liked that they put simple ingredients on display. Coffee beans are not surprising but oatmeal had never occured to me and we use a lot of it at my house.  If I had more available counter space at home I would probably do this.  Also the backspash tile was so pretty.  It wrapped around the whole kitchen area and seemed to me a mini metal subway tile similar to THIS one.


 In this picture there are two rolling pins with designs on them.  I've never seen anything like that and I wondered if they were just decorative or if they had any usefulness. They seem similar to Springerle Rolling Pins (used to make cookies) but were dark stained and pretty intricate.  I want to look for some now. 


I thought this area was a good idea for a small space office.  It could fit in an unused closet, an entry way or that random corner that you may have.  Having the floating "desk" and shelves really clears up floor space.  I'm not an experienced builder or wood worker but I'm sure there is a way to modify counter tops or build this pretty cheaply.  Most wall mounted desks I saw on the market were pretty expensive.


 I really liked the amount of seating in this living room.  There are even hidden "poufs" under the table that are both pretty and useful for extra seats. HERE is a tutorial to make some kid friendly and customizable floor cushions.


This bedroom wasn't "awesome" but I did like the Ikat inspired bedding and the lamps on the side tables.  This bedding is from West Elm and isn't available anymore but a similar color can be found HERE.

Here is a close up of the pillows on the bed. I think my daughter would really like these colors because they remind her of "Ariel" colors and she loves blue.  


This room is out of my comfort zone for many reasons.  There is a lot of color going on and a lot of white.  White scares me a great deal because the inhabitants of my house don't discriminate where they lay a peanut butter covered hand. That said it is still a nice room and I like the brick accent wall as well as the sconces.  I hope one day when we have our "dream" room we will have some really good lighting in there.


 This is from the master bathroom.  The tiles on the wall are so cool and I love the colors in these vases.


This isn't anything remarkable. I just noticed that one accessory that was used throughout the spaces was mirror.  Part of the reason may have been because it is a "neutral" accessory (unlike art or family photos.)  But I liked that interspersed through the decor there were groupings of mirrors.  The living room had a very large one (not pictured so as not to catch my reflection.)  Mirrors are always easy to find and don't have to be expensive.  They are also easy to incorporate in any style so they are a good bet when you can't figure out what to put in a certain spot.  I really want one near our front door to check myself before I leave, but I haven't found one that fits the space or makes sense there (in other words I'm indecisive with decor at times.) :)


Model Home Visit #1

My husband and I love going through model homes both because it is fun looking at new home construction and because it is a fantasy.  Everything is coordinated and everything is clean.  There are no cheerios in the corners and knick knacks can be left lower than 5 feet because there is no one living there to break them.  In addition, there are often nice ideas for your own home that you can pick up from touring a model.  Here are some photos from models we saw recently.

Here is the eating area in the kitchen.


I liked that the benches and stools gave a more open feeling and it seemed like a great place for kids to hang out and eat.

The shelves in the back contained family games and school/art supplies so it would be a great mult-purpose area where the kids could play or do homework while dinner was being prepared. The baskets could hide papers and mail or games. A lot of stores carry baskets, I like a lot from Cost Plus and Ikea.

The wall between the kitchen and living area had these built in shelves that allowed for more display and hidden storage of toys/supplies but also let light through.  It would also be great to have the ability to see the kids if they were in one room or the other so they are never out of the field of vision.


The kitchen itself was nice but not super interesting.  I do like the amount of space they left open though.


The living room had a more grown up dining area and seemed like a great space to have people over.  I really like the mix of different woods and pained furniture that allows for more flexibility in what you buy.  The chairs also match the benches from the kitchen so they could be interchangeable if needed.


The bedroom wasn't complicated or super interesting but I liked the ceiling lamps that freed up the space on the bedside tables.  There is also a lot of storage in those side cabinets and each has a basket for more hideaway storage for less "pretty" things like tissue and glasses.

Most really nice pendant lamps I looked at were pretty pricey but HERE is one from Ikea for only $9


If only this was what my bathroom counter tops looked like.  I would be lucky to have only one tray of stuff (mine and the kids) taking up space let alone have room for a decorative plant.


The "girls" room was nice and bright and I liked that the accessories and furniture could be easily transitioned to an older girl.  The lamps on the side dressers were acrylic or glass and the butterfly/nature theme seemed easy to update or change with new bedding and wall decor.

These are the butterflies that were on the walls.  They also were a cute idea that would be simple to replicate with fabric scraps.  I'm not sure how they were held onto the wall (mental note to check such things next time I see an idea I like.) I think maybe some Velcro type dot or some 3M product that sticks temporarily might work.  These would also be cute for a mobile or attached to a sheer curtain.
Pottery Barn has a paper stick on option that might also be copied using a stencil and craft paper or scrapbook paper.

 The other bedroom had the large bed turned sideways with no head or foot board.  At first I thought this was weird because it was too big to look like a "daybed" but when I thought that a teenage boy might sleep there and their growing limbs and video game playing habits might make a headboard or foot board superfluous, it looked like a good way to save on floor space.

I liked these lamps because (though they are filled with sand and nests with eggs that I found odd for a "boys" room) they could be used in many rooms with different themes if you filled them with different interesting objects or changed them out for seasonal items or even pictures. Click HERE for a similar lamp.


This was just an interesting idea.  It looks like paper cutouts of some kind on a navy blue background but could be duplicated with fabric or paper doilies or some other lightweight craft objects on any color background and used for a bigger "art" piece in a hall or bathroom.  The cost would be mostly for the frame and some paper to back it with (possibly wrapping paper.)

Here is an example of a different but similar idea. Click HERE for the tutorial.
Framed doilies - after


LinkWithin

Related Posts Plugin for WordPress, Blogger...