
We are a family of nerds and we are raising our kids on the same path. They both love Star Wars (among other nerdy entertainment) and it was not hard to convince them to be Luke and Leia for Halloween. My main criteria for Halloween is that they cannot be a ghoul or "evil" thing but can be any other character from a movie or book or history. Also, if I have to make it I try to push them towards something more simple or something I know I can handle.
Making Luke
 |
| Image Source
Given that my boy is 2 and a quarter years old, I didn't think complete authenticity was going to be a big concern. He is more of a big picture sort of guy :). I thought that making it all wouldn't be too hard but on the off chance I might find a karate gi, I went to the Goodwill and looked around. I was quickly greeted by a white karate top that was a size too big but only $3. I shortened the sleeves a little and it fit great. I had an old cream colored pillowcase that wasn't getting used and made a pair of pants out of it. This was done by folding a pair of my son's pants in have at the crotch and tracing the outline on some paper. I then laid the pattern on the fold of the fabric and cut out 2 pieces then sewed them together. I added some elastic at the waist and didn't even hem the legs because they would be shoved into the boots. For the boots I had planned to make boot covers like the ones shown above. Instead I opted to use my daughter's old brown "ugg" style boots and they worked fine. I bought a little brown pleather and cut the right size for a belt and added a little Velcro to close it. We already had a couple light sabers so that was set and I let his hair grow out just to let him have that shaggy 70's Luke hair.

Making Leia
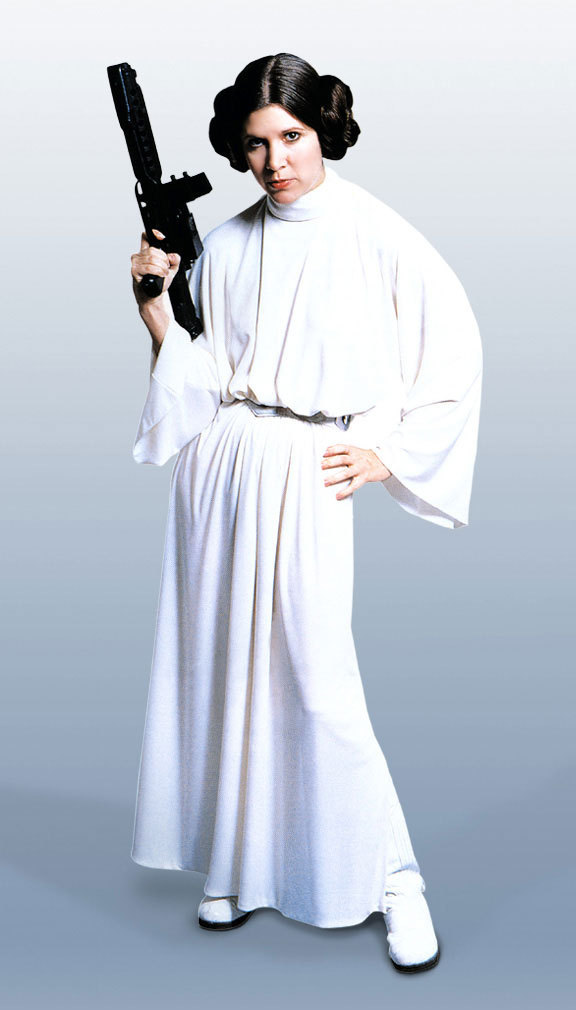 
It is always more complicated making girl clothes. For one, they notice detail and you can't get away with faking something as easily. Also Leia isn't a simple outfit, it is a drapey dress with a mock turtleneck, hood and belt so you can't just pick that up at the Goodwill. My niece also wanted to be Leia and she is 10 months older than my daughter. My mom and I collaborated to figure out how to make the dress without a pattern. She had a bolt of white stretchy knit from an estate sale that she got for $5 a while back with the thought that "I can make something out of this." Well the opportunity presented itself.
I found a tutorial HERE for an adult size Leia costume and used that as the starting point. As you can see below the tutorial called for cutting the fabric out of once piece of material. It makes a kind of "snow angel" shaped cut out. We used an old sheet to do the first cut out then laid that on the main fabric to make the dress cut out. We made it roomy because it has some drape and because the belt would allow for some adjustments.

The sewing was just 2 seams up the sides for the main dress part. Because the fabric doesn't fray, we didn't bother to hem the sleeve ends or the bottom of the dress (so much easier). Without a collar and the hood the dress easily fit over the girls heads because of the stretch. The collar was just a rectangle of fabric with a bit of lightweight interfacing sandwiched inside. The hood was a rectangle of fabic sewn up the back and gathered to fit the neck (shoulder to shoulder). After the collar and hood were attached we added 2 hook and eye closures to the neck. Then we found out a bit about construction. The neck that easily slipped onto the girls without the collar/hood combo would not fit over their heads with it. Ahhh the fun of pattern-less sewing. So we were lucky that the back of the dress was now hidden by the hood and we cut a small slit in the neckline to allow to their noggins to get through. Problem solved and only the people who read this post will know about it. :)
 
The belt was more white fabric (not stretchy but a soft polyester remnant we picked up.) I made a pattern using my daughters waist as a guide for the height and width of the belt. I allowed for 1/2 an inch seam allowance and had the belt itself only go around to the sides of the girls. Inside I used heavy interfacing to give it more structure. After the belt was done and sewn, I added some sport elastic (about 1 1/4 inch wide) to the back to make it easy to pull on and off without a closure. The front design on the actual belt was metal and I was not going to go that far with it. We found some silver sheets of duct tape (I had no idea they came in sheets until we found the stuff at Jo-Ann's) and I cut out the front pentagon and side octagons with little circles in the middle of each. They stuck really well to the fabric and will be fine for costume/dress up purposes as long as the kids don't experiment with peeling them off.

My daughter is a brunette so the hair color wasn't as issue. However the MASSIVE amount of hair in Leia's cinnamon bum's was not going to work. I had some toddler size brown socks and cut off the toes. I rolled them into donut shapes and used them to make 2 sock buns on the sides of her head after making pig tails at the top her her ears. A lot of pins and hair spray later and we have a Leia-ish hair do.
   
Under the dress I had my daughter wear some white knit pants and an undershirt and she just wore her athletic shoes so walking would be easy while trick or treating. (which we do downtown during the day more than worrying about dong it at night when bedtime is upon us.)
|
