Monday, November 14, 2011

Make Your Own: Laundry Detergent


I came across a method to make your own detergent.  There are probably hundreds of posts on how to do this  but I liked the method of dispensing this blog used and her picture directions.

I am not doing a full explanation here since you can click on the link and see it in full but I will give the general instructions and my opinion of the outcome.

Ingredients & Materials Needed.

Borax
Arm & Hammer Super Washing Soda (find it in the laundry soap aisle)
1 bar of Fels-Naptha (or Zote)
1 large pot
1 large container (holds at least 2 gallons with room to stir)
A lot of water

1) grate 1/3 of the soap bar with a cheese grater
2) put that in a pot with 6 cups of water.  DO NOT BOIL but stir and check until the flakes are melted in.
3) Add the borax and Soda and stir to dissolve.  Keep stirring frequently until it is thicker (almost honey)
4) remove from heat.  (At this point the other post uses a big plastic bucket.  I just kept going in my pot.)
Add 4 cups hot tap water and stir. add a few drops of essential oil if you want (I don't).
5) add 1 gallon + 6 more cups of hot tap water and stir.  At this point I transferred the mix to my drink dispensing container that I use to dispense my detergent.
6) Let it sit overnight (or 8ish hours).  Then take an immersion blender and get it good and mixed.  This step is not needed if you use a plain bucket or a wide mouth container to pour it but it IS necessary if you use a drink dispenser like the one shown.
7) If the detergent separates while sitting, shake prior to use then use 1/2 cup per load of wash.

I've read that this is safe to use on HE machines as well.

What I like about this is that it costs under a dollar for 2 gallons of detergent, which is 64 loads worth.  Compared to store bought detergent you are saving anywhere from 5-$15 or more depending on the brand you buy.  I wish it had that "detergent smell" after you are done washing.  It smells great in the container, but leaves no scent on the clothes unless you add your own in the process, which is probably better being that there isn't a lot of fragrance added.  Also, the separation that occurs when the container sits can be frustrating especially when it is full.  I get a good arm workout shaking up 16 pounds of liquid before a load. :)  In general, it seems to work well and I still use pre-treaters or stains.

Thursday, October 20, 2011

Halloween Costume 2011


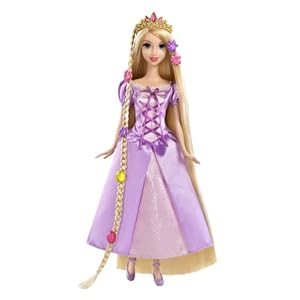
Disney Tangled Featuring Rapunzel Grow and Style Doll
This is the doll she has so it was more modeled after this dress (short sleeved) than the  movie version.

Rapunzel... my version based on Tangled.


Patterns, Materials, Supplies.

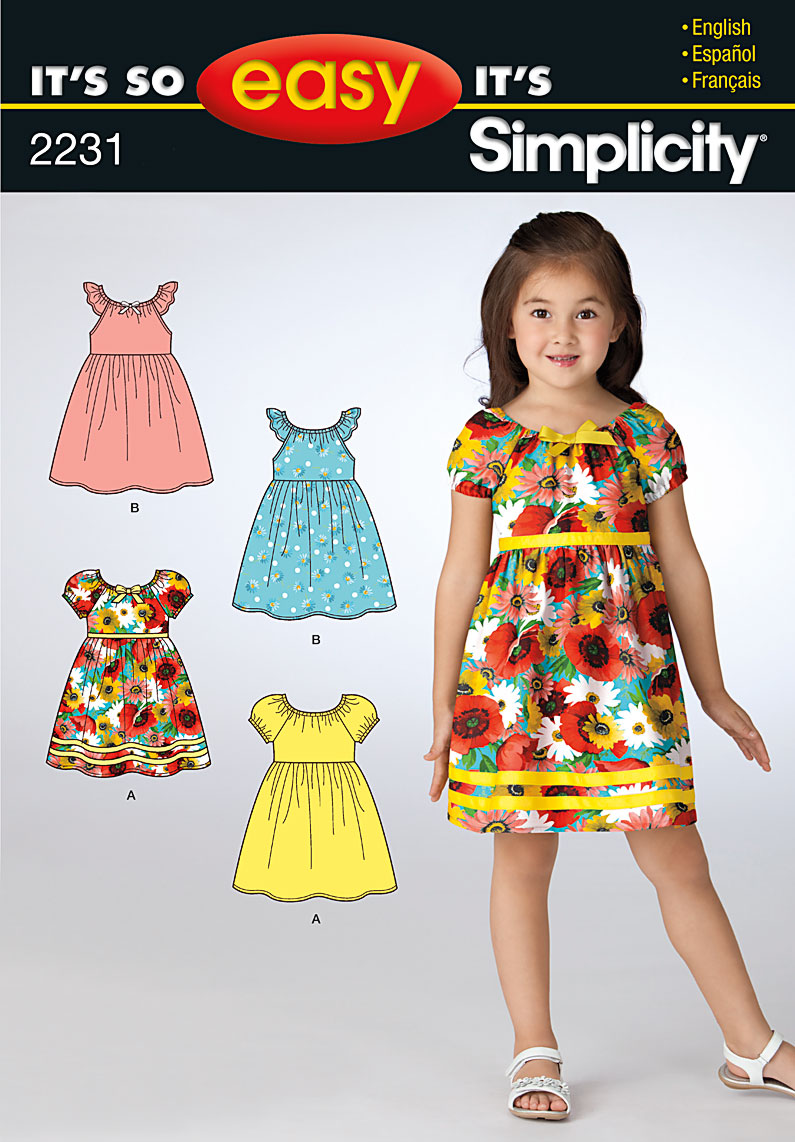
Simplicity Pattern (for top only).  I bought this because it had the top style I wanted and it was really inexpensive.  I also think it is a good simple dress pattern that I could easily use again.
Photo

1 Thrifted adult skirt (Thanks to my mom's good eye at the thrift store.)
Notice the ribbon detail and soft tulle at the hemline...much more work than I would've put into it had I not had this skirt to work with.   

1/2 yard matching purple fabric.
Thread to match
1/4 inch elastic
1 remnant of pink fabric
Contrasting purple satin ribbon (1 inche)
1/4 inch pink ribbon (for bodice detail)
sewing machine
needle
scissors
pins and safety pins
***good to have but not necessary: a bodkin, and a seam gauge

Difficulty Level: Intermediate

Active Time Sewing: Not quite sure.  I worked on and off for 2 weeks during naps and after the kids had gone to sleep and any minutes they would let me.  The bodice took the longest and had the most detail.  I just measured a 6.5 x7" piece and hemmed the edges before centering it on the front of the bodice.  I also added  3 strips of  ribbon to the sleeves before making the casing for the neck elastic.

Once the top was done, I figured out the length I wanted for the skirt and basted the waste to gather it then attached it to the bodice.  I tacked on the criss-crossed ribbon in front after the dress was done and tied a bow at the top.  The ends of the ribbon were coated with some Fray-Check

The next issue I had was with the crotchet section of the skirt that hits about hip level on Isabella.  I didn't want her underwear to show.  After debating other options (wearing shorts/pants, or attaching a bias strip to that section,) I used the 2nd layer of the thrifted skirt and made a simple slip to go under the dress.


My main objective when making the dress was to make it comfortable and as easy as possible.  My daughter will not stand for itchiness (hence the lace left out of the neckline and arm holes.)  Also, I realize the dress is not a duplicate of the movie version.  There are a couple reasons for this.  First, it is still  pretty warm here on Halloween.  During the day it can even get up to 90 degrees some years, so long sleeves were not a good idea and would also be difficult to make and wear.  Second, the skirt had a lot of detail on its own so I didn't want to mess with that by trying to copy the movie version.

Now I'm hoping she will let me convince her to NOT wear the wig (which seems loony, I know) because she gets sweaty quickly and I can see her 3.5 year old brain INSISTING on wearing it only to INSIST on taking it off 10 minutes later. :)  Still I plan to brush the crazy thing and braid it just in case she has her heart set on the blasted thing.  At least I will try to get some good pictures of her in it before she gets uncomfortable.

Some Love for the Butternut Squash


Firstly, this squash is much closer to pumpkin than to zucchini.  If you don't like yellow summer squash or the regular green zucchini, don't be afraid because butternut squash is nothing like that.  Secondly, I have found that this is a great side dish, salad addition, or you could puree it for a baby's 1st food.

I was introduced to how  to make this at a cooking demonstration/class.  They used it in a honey vinegrette salad.   After making the salad myself, my husband and I were both wondering why we didn't just eat the squash because it was so good on its own.


Roasted Butternut Squash

1 Large butternut squash
1/4 cup ex. virg. olive oil
3 tsp salt
1/2 tsp pepper
1 tsp seasoning (Italian works well, or Poultry seasoning, or dried/ fresh sage) ***Optional

1.) Preheat oven to 400 degrees. Peel the squash.  This is slightly difficult once you get the 1st half peeled.  My suggestion is to use a paper towel to hold the peeled side when finishing the other half.  The squash gets really slippery after you peel it and is almost impossible to grip securly.

2.) Cut the Top and bottom ends off.  Turn it up on one flat end and cut it in half.  Scoop out the seeds with a spoon.  Lay cut side down and cut in 1 inch strips, then into cubes.  This works best if you start at the bottom end so the hole is more stable.

3.) Place on a large baking sheet or in a 13 x 9 inch baking dish (something that has enough room to let it all lay in one layer.   Drizzle with the EVOO. Sprinkle on the salt, pepper, and seasoning.  Use your hands to toss it until all is coated.

4.) Place in oven for 15 minutes.  Toss and put it back in for 15 minutes.  Check it with a fork.  It should be VERY tender, without any hard parts.  If it isn't leave it in for another 5-10 minutes.

Serve as a side dish or add to a salad or a pasta dish.  If you wanted to use this as a baby food, eliminate the salt and pepper then put the finished cooled squash in a blender or food processor.


HERE is a recipe similar to what I made but with poultry seasoning instead of sage because I didn't have any. :)


Tuesday, May 17, 2011

Great Idea!

Image Source
I came across this website on a friend's Facebook page.  It is one of those "Why didn't someone think of that sooner?" type sites. 

Take Them A Meal, lets you create a meal schedule for someone in need.  This might be due to illness, a new baby, or some difficult times in their lives.  People can search and sign up for a meal slot so meals are organized.  I would love to use this next time someone I know needs it and will be suggesting it to friends.

Monday, May 16, 2011

Indian Veggie Rice


Recipe from Weelicious.

I basically increased the Weelicious recipe by using 2 potatoes, 2 carrots 1 large onion 2 garlic, 1.5 C of rice, 2.5 tsp of Curry 2 tsp salt and 1 C. peas.

I also added a pinch of ginger.

I wanted to use it as a meatless meal not  just a side dish and while her suggestion that her recipe serves 4 is probably accurate for a side dish, I doubt it would feed my husband's appetite. 

Mainly I thought that all of the ingredients are super kid friendly (and easy for my 1 year old to feed himself) so I was all for trying it.  My 3 year old liked it a lot.  My 1 year old liked it but it was messy with the yellow curry coloring.  I think next time it would be better with some chicken breast mixed in and maybe a little cinnamon.  Overall though it was filling and tasted good. :)  It did take about 1 hour to cook all the way with the brown rice (not basmati brown as Weelicious suggests)  but I started it early and just stirred it every 20 minutes so it wasn't very time consuming.

LinkWithin

Related Posts Plugin for WordPress, Blogger...