Showing posts with label kids. Show all posts

Thursday, October 25, 2012

Halloween Costumes 2012: DIY Luke and Leia


We are a family of nerds and we are raising our kids on the same path.  They both love Star Wars (among other nerdy entertainment) and it was not hard to convince them to  be Luke and Leia for Halloween.  My main criteria for Halloween is that they cannot be a ghoul or "evil" thing but can be any other character from a movie or book or history.  Also, if I have to make it I try to push them towards something more simple or something I know I can handle.

Making Luke

Image Source

Given that my boy is 2 and a quarter years old, I didn't think complete authenticity was going to be a big concern.  He is more of a big picture sort of guy :).  I thought that making it all wouldn't be too hard but on the off chance I might find a karate gi, I went to the Goodwill and looked around.  I was quickly greeted by a white karate top that was a size too big but only $3.  I shortened the sleeves a little and it fit great.  I had an old cream colored pillowcase that wasn't getting used and made a pair of pants out of it.   This was done by folding a pair of my son's pants in have at the crotch and tracing the outline on some paper.  I then laid the pattern on the fold of the fabric and cut out 2 pieces then sewed them together.  I added some elastic at the waist and didn't even hem the legs because they would be shoved into the boots.  For the boots I had planned to make boot covers like the ones shown above. Instead I opted to use my daughter's old brown "ugg" style boots and they worked fine.  I bought a little brown pleather and cut the right size for a belt and added a little Velcro to close it.  We already had a couple light sabers so that was set and I let his hair grow out just to let him have that shaggy 70's Luke hair.


Making Leia


It is always more complicated making girl clothes.  For one, they notice detail and you can't get away with faking something as easily. Also Leia isn't a simple outfit, it is a drapey dress with a mock turtleneck,  hood and belt so you can't just pick that  up at the Goodwill.  My niece also wanted to be Leia and she is 10 months older than my daughter.  My mom and I collaborated to figure out how to make the dress without a pattern.  She had a bolt of white stretchy knit from an estate sale that she got for $5 a while back with the thought that "I can make something out of  this."  Well the opportunity presented itself.

I found a tutorial HERE for an adult size Leia costume and used that as the starting point.  As you can see below the tutorial called for cutting the fabric out of once piece of material.  It makes a kind of "snow angel" shaped cut out.  We used an old sheet to do the first cut out then laid that on the main fabric to make the dress cut out.  We made it roomy because it has some drape and because the belt would allow for some adjustments.


The sewing was just 2 seams up the sides for the main dress part.  Because the fabric doesn't fray, we didn't bother to hem the sleeve ends or the bottom of the dress (so much easier).  Without a collar and the hood the dress easily fit over the girls heads because of the stretch.  The collar was just a rectangle of fabric with a bit of lightweight interfacing sandwiched inside.  The hood was a rectangle of fabic sewn up the back and gathered to fit the neck (shoulder to shoulder).  After the collar and hood were attached we added 2 hook and eye closures to the neck.  Then we found out a bit about construction.  The neck that easily slipped onto the girls without the collar/hood combo would not fit over their heads with it.  Ahhh the fun of pattern-less sewing.  So we were lucky that the back of the dress was now hidden by the hood and we cut a small slit in the neckline to allow to their noggins to get through.  Problem solved and only the people who read this post will know about it. :)

The belt was more white fabric (not stretchy but a soft polyester remnant we picked up.)   I made a pattern using my daughters waist as a guide for the height and width of the belt.  I allowed for 1/2 an inch seam allowance and had the belt itself only go around to the sides of the girls.  Inside I used heavy interfacing to give it more structure.  After the belt was done and sewn, I added some sport elastic (about 1 1/4 inch wide) to the back to make it easy to pull on and off without a closure.  The front design on the actual belt was metal and I was not going to go that far with it.  We found some silver sheets of duct tape (I had no idea they came in sheets until we found the stuff at Jo-Ann's) and I cut out the front pentagon and side octagons with little circles in the middle of each.  They stuck really well to the fabric and will be fine for costume/dress up purposes as long as the kids don't experiment with peeling them off.

My daughter is a brunette so the hair color wasn't as issue.  However the MASSIVE amount of hair in Leia's cinnamon bum's was not going to work.  I had some toddler size brown socks and cut off the toes.  I rolled them into donut shapes and used them to make 2 sock buns on the sides of her head after making pig tails at the top her her ears.  A lot of pins and hair spray later and we have a Leia-ish hair do.  


Under the dress I had my daughter wear some white knit pants and an undershirt and she just wore her athletic shoes so walking would be easy while trick or treating. (which we do downtown during the day more than worrying about dong it at night when bedtime is upon us.)

Friday, May 25, 2012

Eating out with kids...successes and failures.

1.) chick-fil-a

SUCCESS!:  The most simple explanation is that most kids love chicken.  Chick-fil-a has chicken pieces (as opposed to nuggets) which makes the food at least identifiable as a real meat.  The service is always friendly and helpful.  They have free placemats which ROCKS!!! The decor is fun and family friendly and there is a play structure inside (I have yet to be brave enough to let my kids venture into these though.)  The have regular family nights with crafts and activities that are really cute and fun.

Cons: They are closed Sundays (which for us might be prime time to be able to head over there).  The food is more expensive than other fast food, but I always attribute this to the fact that it is actual food so you pay for the quality of what you are eating and the service they provide.

Similar options: Farmer Boy's, Subway, Baja Fresh,

2.) 

SUCCESS!: Red Robin has been a place we have enjoyed several times out with family.  They have the basic crayons and color on menu which is always helpful.  What is good is the atmosphere.  There are fun posters everywhere and things to look at (for my kids age 2 and 4, it is really easy to get them interested in searching the walls for funny things.)  The food is kid friendly (burgers, pizza, chicken fingers, etc.) and they have substitutes for fries so they aren't eating a huge amount of fatty food.  The restaurant itself is not quiet so the giggles and games kids get into will not be an issue to the other diners.  The service is usually good and friendly. This is about as close to a real restaurant as we have had success with.
-
Cons: The only one I can think of is that the wait for food is often longer than "fast food".   I think it would be a great idea to have your selections for kids picked out first and order that with the drinks while everyone else decides.  Better yet, go online and pick your food (have everyone with you do this) so you can eliminate the 10-15 minute menu gazing session.  This will help the whole thing go faster and you can get the kids walking around outside to get out all the energy they saved from sitting. :)

Similar options: Outback, Applebee's, Chili's, Claim Jumper's,

OTHER SUCCESSES:

*Denny's has always been quick and easy (albeit unhealthy lol) but if you gotta go out and are panicking about it, Denny's is a good start.

*Local family restaurants and diners.  We have one Mexican restaurant that we have gone to since I was a kid.  It is casual and serves quesadillas (which again, most kids love) and you don't have to tip because you aren't waited on (sort of like other fast food places where you get your drinks and stick a number on your table for food.) So those places are great. Think fast service and uncomplicated food choices.

*Starbucks can work for short sit downs and if you grab a good spot. It also helps to have a grandpa along to run around with the kids outside when they get antsy (as my dad often does after church.) I also pack a lunch and have them eat there while we enjoy our drinks.

*Ikea.  Weird I know, but there is a lot there that is super kid friendly.  If its a rainyday and you want to get out have them play pretend house in Ikea for awhile then head to the restaurant where you can get them a meal for under $3.  A hot dog or a slice of pizza at the exit bistro is even less.

*Beni Hana type restaurant.  This is like a show and food at the same time.  Though expensive the food is cooked right in front of you and served right away.  I wouldn't suggest it for a kid under 2 unless they are really well behaved and can focus on that type of thing but if you have a kid that will be into the spectacle, you might have a fun nice dinner with the family for a "special occasion."

*Outback,

FAILURES: Oh so many....

*Any place that is even slightly for grown ups DOES NOT WORK.  If you can't hear people talking and chatting when you walk in (meaning that the noise level is buzzing and there isn't likely to be serious dates or anything going on) I would turn around and  walk out.

*Any place that takes longer than 10 minutes to seat you at a table DOES NOT WORK.  If reservations are needed, DO IT.  Also the best times to head out to a restaurant seems to be late afternoon/early evening. 4:00-5:30ish.  Beat the dinner rush and you won't have to wait long for seating or food.

*Any place with unfamiliar food should be avoided until they are more mature.

*Any place with cloth napkins (unless you have a nice little girl who will go to a cute tea restaurant for an hour...that is an exception.) :)

WHEN IN DOUBT: Order the food and take it to a local park or even home for a treat.  This is awesome with so many places offering to go options and then you don't feel weird about splitting up entrees to share with the kids and you save on tip. :)

SEE THIS BLOG FOR A REAL AND FUNNY ILLUSTRATION OF EATING OUT WITH KIDS>

Thursday, October 20, 2011

Halloween Costume 2011


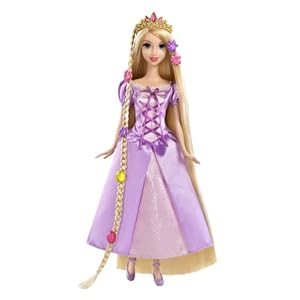
Disney Tangled Featuring Rapunzel Grow and Style Doll
This is the doll she has so it was more modeled after this dress (short sleeved) than the  movie version.

Rapunzel... my version based on Tangled.


Patterns, Materials, Supplies.

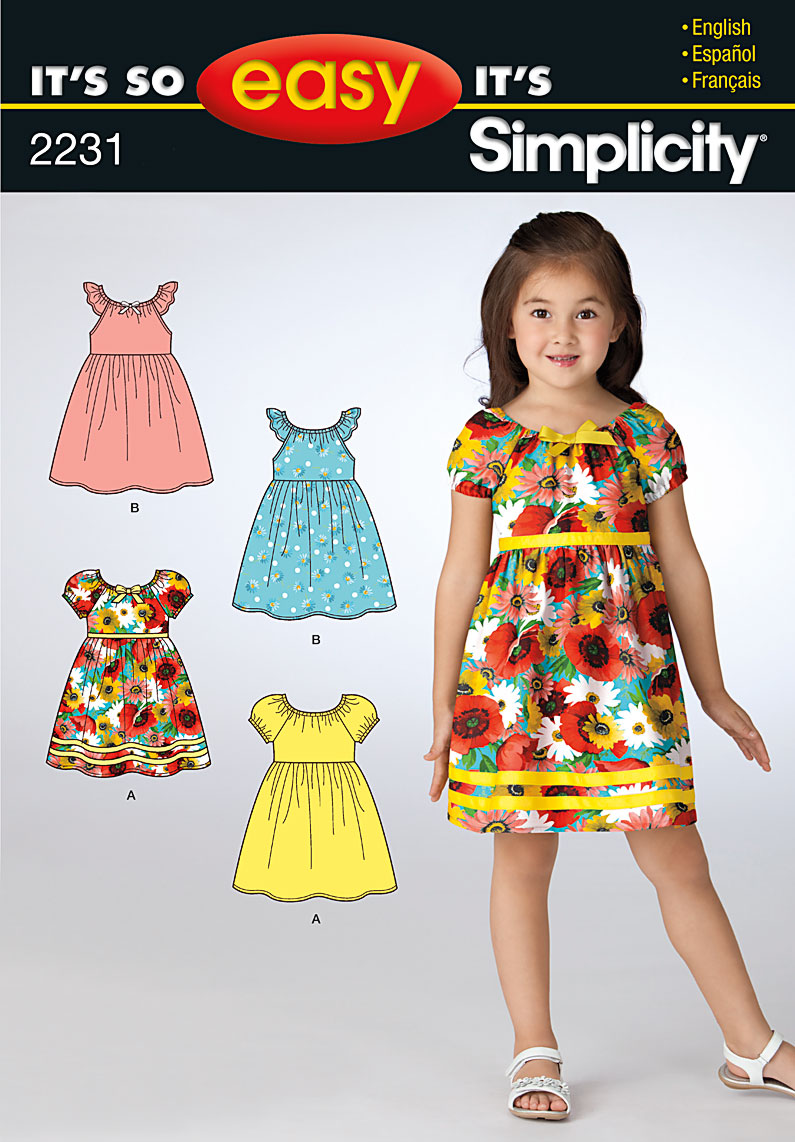
Simplicity Pattern (for top only).  I bought this because it had the top style I wanted and it was really inexpensive.  I also think it is a good simple dress pattern that I could easily use again.
Photo

1 Thrifted adult skirt (Thanks to my mom's good eye at the thrift store.)
Notice the ribbon detail and soft tulle at the hemline...much more work than I would've put into it had I not had this skirt to work with.   

1/2 yard matching purple fabric.
Thread to match
1/4 inch elastic
1 remnant of pink fabric
Contrasting purple satin ribbon (1 inche)
1/4 inch pink ribbon (for bodice detail)
sewing machine
needle
scissors
pins and safety pins
***good to have but not necessary: a bodkin, and a seam gauge

Difficulty Level: Intermediate

Active Time Sewing: Not quite sure.  I worked on and off for 2 weeks during naps and after the kids had gone to sleep and any minutes they would let me.  The bodice took the longest and had the most detail.  I just measured a 6.5 x7" piece and hemmed the edges before centering it on the front of the bodice.  I also added  3 strips of  ribbon to the sleeves before making the casing for the neck elastic.

Once the top was done, I figured out the length I wanted for the skirt and basted the waste to gather it then attached it to the bodice.  I tacked on the criss-crossed ribbon in front after the dress was done and tied a bow at the top.  The ends of the ribbon were coated with some Fray-Check

The next issue I had was with the crotchet section of the skirt that hits about hip level on Isabella.  I didn't want her underwear to show.  After debating other options (wearing shorts/pants, or attaching a bias strip to that section,) I used the 2nd layer of the thrifted skirt and made a simple slip to go under the dress.


My main objective when making the dress was to make it comfortable and as easy as possible.  My daughter will not stand for itchiness (hence the lace left out of the neckline and arm holes.)  Also, I realize the dress is not a duplicate of the movie version.  There are a couple reasons for this.  First, it is still  pretty warm here on Halloween.  During the day it can even get up to 90 degrees some years, so long sleeves were not a good idea and would also be difficult to make and wear.  Second, the skirt had a lot of detail on its own so I didn't want to mess with that by trying to copy the movie version.

Now I'm hoping she will let me convince her to NOT wear the wig (which seems loony, I know) because she gets sweaty quickly and I can see her 3.5 year old brain INSISTING on wearing it only to INSIST on taking it off 10 minutes later. :)  Still I plan to brush the crazy thing and braid it just in case she has her heart set on the blasted thing.  At least I will try to get some good pictures of her in it before she gets uncomfortable.

Friday, February 25, 2011

My "Boy" Room

 To be honest, a lot of this I would do for a boy or a girl.  However, we are generally not into sports themes and I am not a huge fan of going all the way with some Character themed room (superhero, or movie etc.) I LOVE this bedding and would have put it in the kids room now if I could afford it (or had the time to make it myself.)  There is so much you could do with this theme and in these colors that could easily be adapted as kids grow older.
Land of Nod Bedding
http://images.landofnod.com/is/image/LandOfNod/SolarSystem_Bedding_ALT?$sharelarge$

Lamp
http://images.landofnod.com/is/image/LandOfNod/3301281_Saturn%20Lamp_07H?$share$http://www.potterybarnkids.com/pkimgs/ab/images/dp/wcm/201039/0028/img25m.jpghttp://www.potterybarnkids.com/pkimgs/ab/images/dp/wcm/201047/0014/img13m.jpghttp://images.landofnod.com/is/image/LandOfNod/Beat_our_Chest_Esp?$share$


http://www.potterybarnkids.com/pkimgs/ab/images/dp/wcm/201049/0020/img49m.jpg
Add caption

http://www.potterybarnkids.com/pkimgs/ab/images/dp/wcm/201049/0020/img15m.jpg
LED artwork

Wednesday, December 8, 2010

Poinsettia Hair/Hat Clip


Using the tutorial from Infarrantly Creative I made my daughter and niece some hair (or hat) clips.  I didn't print out the template ,but used my daughter's head as a starting point for a good size clip.  I didn't have (or remember to buy) a button making kit, so I just used a circle of felt for the top to cover the stitches.   I also added some grosgrain ribbon around the clip so it didn't pull the girls' hair.

My 2.5 year old actually "helped" by pulling the needle through after I had pushed it most of the way, so it was nice that she felt like she could participate in the sewing. 

How to make a travel crayon pouch

 
I made this for myself and my daughter to eliminate a frustration I had.  She loves to color and will do well coloring at restaurants and places where we have to have her sitting for awhile, but keeping crayons in a diaper bag is not practical.  I had seen many crayon case tutorials online, most of them were rolled up in little spirals and tied with ribbon.  I thought about it and realized I would need something for her to draw on and the paper will get mangled and lost in the diaper bag. So I made a slight modification to what others had done and made this pouch. This way I can keep a small notepad or even folded coloring pages in there and not worry when I get somewhere that she needs paper.   


Difficulty = Easy
Minimal sewing skills are required, just basic knowledge of your machine.  Must know how to make a straight stitch and back stitch, thread and load a bobbin and thread the machine.  Depending on the material of the place mat, mistakes can be easy to disguise.  The type I used is great for hiding flaws.  It is ribbed in texture which helps provide guide lines to follow when sewing and mistakes are not evident if the thread matches.

Materials:
*A cloth place mat, the kind I've been using is available at Walmart (sometimes) and Target (in solid colors)
*A 16 count box of crayons
*a small note pad (I got a 3 pack of Mead 4"x6" memo pads from the grocery store for about $1)
*Grosgrain ribbon in a coordinating color in 1/4" to 1" width depending on preference or what you have available (black works well for most and a small roll would be under $2)
 *Thread that blends with the place mat
* sewing machine
*Ruler or tape measure
* pins

Steps
 1. Fold up the long side of the place mat 3 inches.  Sew along the existing seam or as close to it as you can on both sides.


2. Measuring from that first seam, mark four 1 inch sections for the pockets. 


3. After the 4 pockets measure 4.5 inches from the last seam.  This will make your notepad pocket. 


4. From the end of the 4.5" pocket continue measuring every inch to the last seam on the right side.  If the place mat isn't measuring perfectly within the inches adjust each one slightly to make the pockets look about the same size.  Also, I noticed with the first pouch I made, my place mat was not as long as the subsequent ones I bought and I had to eliminate a whole pocket from it.  It doesn't matter too much because fitting 12-14 crayons will be enough variety for most kids.

5. Sew each line from the top of the flap down to the fold.  Make sure to back-stitch at the beginning and end of the line.  If you're fast and did all your measuring/pinning,  this should only take about 10 minutes..


6. Pin the ribbon tie to the back of the pouch just above the slot openings (about 3 1/4" up from the fold.)


7. If you can, adjust the width of  your stitch to the narrowest width so you can get close to both edges of the ribbon.  Sew ribbon staying about 4 inches from the edge going to 4 inches from the other edge.  Flip around and sew again if you are using a wide ribbon.  For 1/4 inch, one pass will be fine.


Sorry I just couldn't take a clear picture here but you see how close the needle is to the right side (sort of.)

8. Fold the top flap down to meet the slot openings.  Pin this to secure.  Sew right along the top fold to make a permanent crease (less llikely crayons will fall out and more likely it will easily fold to put away.)


9. Insert crayons and pad and fold up.  You're ready to color on the go. :o)


P.S. Suzanne, if you read this, Zach is getting that blue one for Christmas. ;o)

Sunday, August 29, 2010

Products I Love for My Kids Part 2

1.) Crane brand Cool Mist Humidifier


Crane Adorable 1 Gallon Cool Mist Humidifier


This is one of those items that you know you will need but some how no one gets it for your baby shower.  Its not "gifty" enough or "cutesy" enough I guess.  But you will need it and when you do you will not want to have to go searching for one during cold season.

I have not tried out a bunch of these, just this one but I like it for several reasons.  1.) It is decorative (sort of) and cute.  2.) The trunk helps to direct the flow of the vapor. 3.) It is reasonably priced at around $35, in my opinion, for an item that will be used several times throughout the baby, toddler, and preschool years and maybe beyond.  Also, if you have a child with eczema or dry skin humidifiers are recommended and might be used for a whole season.

2.) A Basic Play Yard

Graco Pack n Play - Animal Time
I know there are AWESOME play yards with various features and attachments.  Here is the thing, I have huge kids.   All of those extra attachments would be useful for about 1-2 months for me.  Seeing that those ultra cool, decorative, battery powered playyards can run into the $200 range, while a basic one runs closer to $60-$70 I am saving over $100 by not getting all the fancy stuff.  Given that play yard sheets cost around $6-$10 bucks each as well (and I would make them if I had the time) the extra saved $ makes me feel less bad about buying a couple nice padded sheets that are super soft.

3.)Baby Medicine syringe.
 Baby Child Medicine Set spoon dropper syringe

This comes in a set but the syringe part is the best.   I don't know if this is the brand I get but I find mine at Walmart in the medical section near the thermometers.  Focus on the middle syringe and topper.  That bottle topper fits any sized medicine bottle and does double duty.  First, it makes for easy mess free measurements of the meds.  Second, and this is my favorite part, it allows you to get the meds out without sticking the dropper into the medicine bottle which contaminates the whole bottle with saliva or with whatever illness your baby has.  I want to get several of these syringes for the different types of meds my kids take so I don't have to deal with those dang droppers.  Also the syringe doesn't drip out the medicine like a dropper does so you have more control when getting it in a wiggling kid's mouth.

LinkWithin

Related Posts Plugin for WordPress, Blogger...