Tuesday, February 28, 2012

Party Cupcakes

I made some cupcakes for my mother in law's birthday party this weekend.  I used the modification for 'The Perfect Cupcake Recipe (using a mix)"  and made a quick Marshmallow Buttercream Frosting. (For the frosting I used less butter in the mix but only 1.5 sticks rather than 2 whole sticks. I wouldn't go much less than that because it will change the consistency.)

After making a ridiculous mistake (not adding water) my cupcakes turned out disastrous.  The lesson: Don't bake while distracted by children.

Thanks to my brother running to the store for some replacement ingredients I was able to make another batch and they were really good.

After the cupcakes were cooled, I piped on the frosting using a 1M star tip and by starting in the middle and swirling it outward you get a flower/rose look to your frosting.  You can find some good general cupcake decorating tutorials HERE.

Wednesday, February 1, 2012

Rainbow Cookies


In my daughter's Cubbie (AWANA) workbook, the verse for the week was "All Your words are true...". The story focused on God keeping His promises and the story of Noah's Ark.  The rainbow at the end of the story represents God keeping his promise to Noah.

The workbook has suggested activities for home study/practice and this week's was making rainbow cookies.  There were no instructions but I figured it couldn't be that hard.

I made a basic sugar cookie recipe. I also didn't have the forethought to take pictures of the process but it was pretty simple.

SUGAR COOKIES

1/2 cup butter (softened)
1 cup sugar
1 egg
1 tsp baking powder
1 3/4 cups flour
1 tbsp milk
1/2 tsp vanilla
1/4 tsp salt

mix the wet (butter sugar, egg, vanilla) then mix in the dry ingredients.

At this point, I separated the dough into 6 small bowls and used the basic 4 pack of food coloring to make the colors. I would suggest adding a bit more to red and a little less to the purple bowl.

For red =8-10 drops of red food coloring
For orange +6 yellow 2-3 drops of red
For yellow = 8-10 drops of yellow
For green = 8 drops green
For blue = 8-10 drops blue
For purple = 6 drops red 2-3 drops blue

(adjust for desired colors orange and yellow are pretty similar so make the orange darker so the baked version shows contrast)

Flour a board and lay out a sheet of plastic wrap on a flat surface or baking sheet ready for the rolled out dough.  I started with red and found that it was much easier to shape using my hands than using a rolling pin but go ahead and do what works for you.  I shaped the red into an oblong shape about 8 inches by 4 inches.  The goal is more for the depth of about 1/4 of an inch.  I repeated with orange, yellow, green, blue and purple layering each on top of the other on the plastic wrap.  Then I rolled all the colors into a log shape so the red was surrounding the outside of all the colors, and wrapped it in the plastic wrap then let it sit in the refrigerator for 1.5-2 hours.

When ready, preheat the oven to 375 degrees F.   Unwrap the log and cut into 1/4 inch-1/2 inch slices and lay out on a cookie sheet leaving about 1.5-2 inches between.  Cook for 12-15 minutes.  makes 18-24 cookies depending on size.


Saturday, January 28, 2012

Model Home #2

This is in the same development but is much more modern in styling.  In the entrance/TV lounge I really liked the clear acrylic coffee table.  I'm usually not into modern stuff but I liked how uncluttered it looked.  It may not be practical with kids but in a living room or a more adult room it would work well. A similar look can be found HERE.

This bright color is not something I would probably do in my house.  I'm not brave enough yet.  It is really fun though.  I also like that they color coordinated all the books on the bottom shelf.  How nice it would be to have books be decorative instead of just crammed in every inch (as mine are.) A similar bookcase can be found HERE in a clover green.


I LOVED this kitchen.  It was so spacious and light.  I could fit my living room and kitchen into this space easily.


The dining chairs didn't look very comfortable but they did look "cool."  They look like Eames chairs or some sort or reproduction/inspiration of one. I wish I would have tried to sit on one though.  I imagine after a dinner or a game night your bottom might look pretty weird.


I really liked these candle holders and the clean white table.  Again, not sure how crazy it would make me with kids and spaghetti spilling on it but its a lovely thought. :)


I liked that they put simple ingredients on display. Coffee beans are not surprising but oatmeal had never occured to me and we use a lot of it at my house.  If I had more available counter space at home I would probably do this.  Also the backspash tile was so pretty.  It wrapped around the whole kitchen area and seemed to me a mini metal subway tile similar to THIS one.


 In this picture there are two rolling pins with designs on them.  I've never seen anything like that and I wondered if they were just decorative or if they had any usefulness. They seem similar to Springerle Rolling Pins (used to make cookies) but were dark stained and pretty intricate.  I want to look for some now. 


I thought this area was a good idea for a small space office.  It could fit in an unused closet, an entry way or that random corner that you may have.  Having the floating "desk" and shelves really clears up floor space.  I'm not an experienced builder or wood worker but I'm sure there is a way to modify counter tops or build this pretty cheaply.  Most wall mounted desks I saw on the market were pretty expensive.


 I really liked the amount of seating in this living room.  There are even hidden "poufs" under the table that are both pretty and useful for extra seats. HERE is a tutorial to make some kid friendly and customizable floor cushions.


This bedroom wasn't "awesome" but I did like the Ikat inspired bedding and the lamps on the side tables.  This bedding is from West Elm and isn't available anymore but a similar color can be found HERE.

Here is a close up of the pillows on the bed. I think my daughter would really like these colors because they remind her of "Ariel" colors and she loves blue.  


This room is out of my comfort zone for many reasons.  There is a lot of color going on and a lot of white.  White scares me a great deal because the inhabitants of my house don't discriminate where they lay a peanut butter covered hand. That said it is still a nice room and I like the brick accent wall as well as the sconces.  I hope one day when we have our "dream" room we will have some really good lighting in there.


 This is from the master bathroom.  The tiles on the wall are so cool and I love the colors in these vases.


This isn't anything remarkable. I just noticed that one accessory that was used throughout the spaces was mirror.  Part of the reason may have been because it is a "neutral" accessory (unlike art or family photos.)  But I liked that interspersed through the decor there were groupings of mirrors.  The living room had a very large one (not pictured so as not to catch my reflection.)  Mirrors are always easy to find and don't have to be expensive.  They are also easy to incorporate in any style so they are a good bet when you can't figure out what to put in a certain spot.  I really want one near our front door to check myself before I leave, but I haven't found one that fits the space or makes sense there (in other words I'm indecisive with decor at times.) :)


Model Home Visit #1

My husband and I love going through model homes both because it is fun looking at new home construction and because it is a fantasy.  Everything is coordinated and everything is clean.  There are no cheerios in the corners and knick knacks can be left lower than 5 feet because there is no one living there to break them.  In addition, there are often nice ideas for your own home that you can pick up from touring a model.  Here are some photos from models we saw recently.

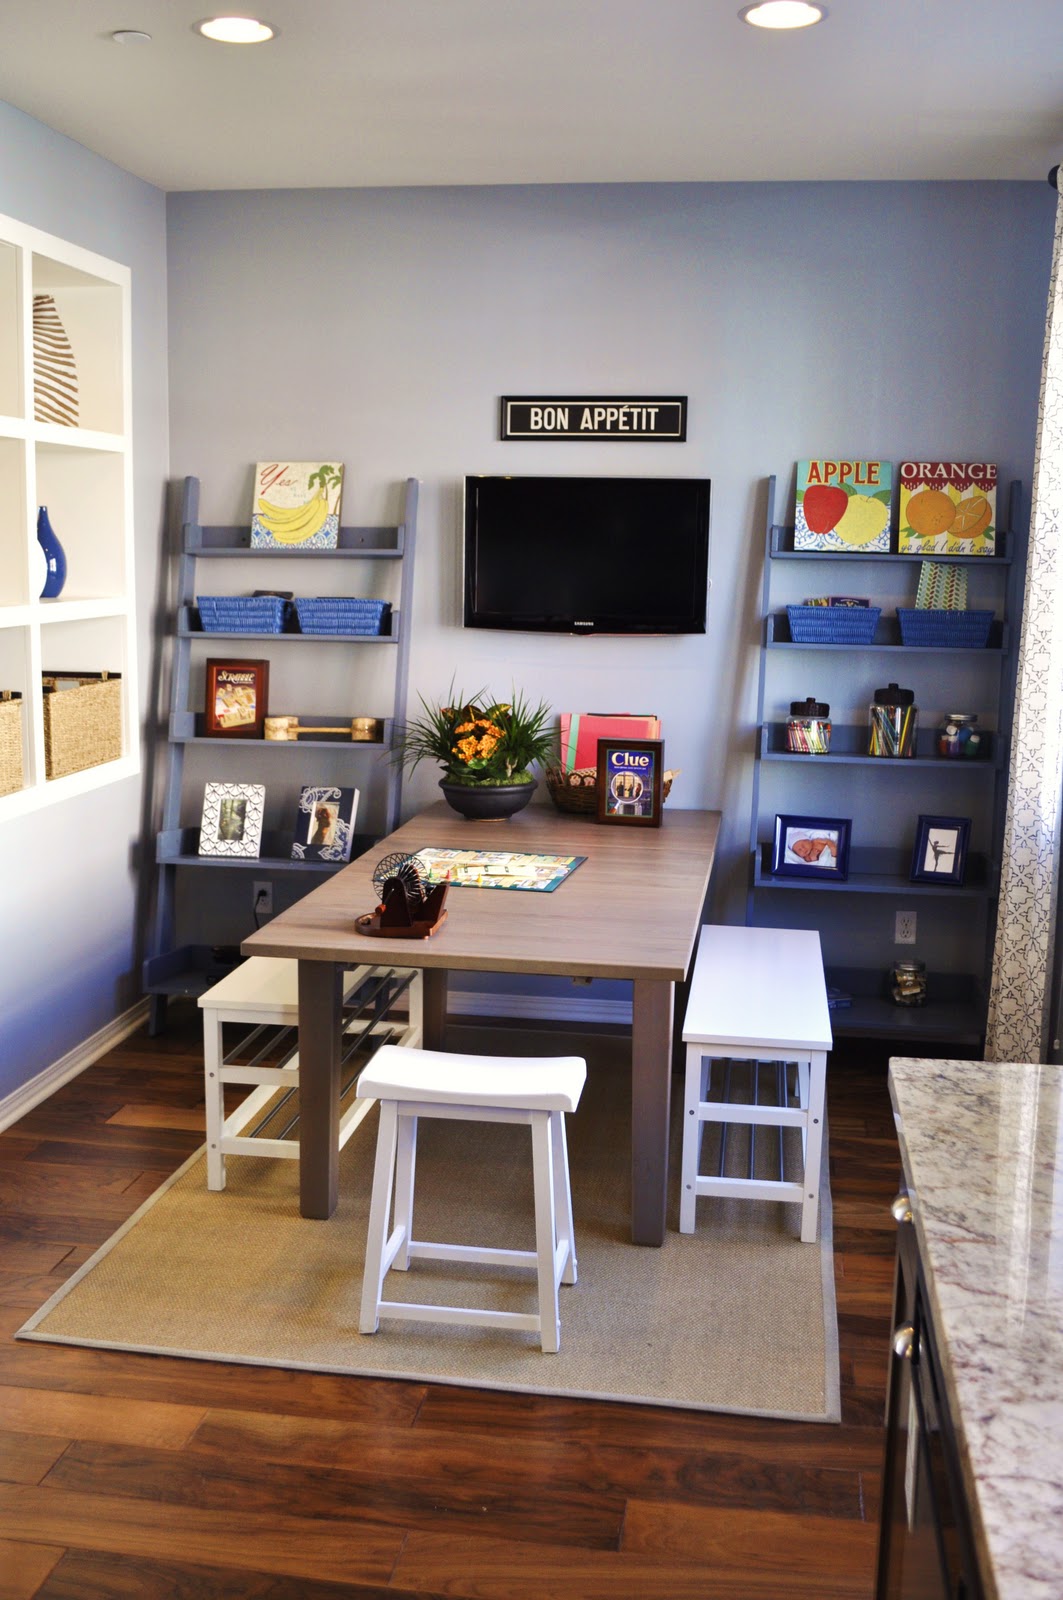
Here is the eating area in the kitchen.


I liked that the benches and stools gave a more open feeling and it seemed like a great place for kids to hang out and eat.

The shelves in the back contained family games and school/art supplies so it would be a great mult-purpose area where the kids could play or do homework while dinner was being prepared. The baskets could hide papers and mail or games. A lot of stores carry baskets, I like a lot from Cost Plus and Ikea.

The wall between the kitchen and living area had these built in shelves that allowed for more display and hidden storage of toys/supplies but also let light through.  It would also be great to have the ability to see the kids if they were in one room or the other so they are never out of the field of vision.


The kitchen itself was nice but not super interesting.  I do like the amount of space they left open though.


The living room had a more grown up dining area and seemed like a great space to have people over.  I really like the mix of different woods and pained furniture that allows for more flexibility in what you buy.  The chairs also match the benches from the kitchen so they could be interchangeable if needed.


The bedroom wasn't complicated or super interesting but I liked the ceiling lamps that freed up the space on the bedside tables.  There is also a lot of storage in those side cabinets and each has a basket for more hideaway storage for less "pretty" things like tissue and glasses.

Most really nice pendant lamps I looked at were pretty pricey but HERE is one from Ikea for only $9


If only this was what my bathroom counter tops looked like.  I would be lucky to have only one tray of stuff (mine and the kids) taking up space let alone have room for a decorative plant.


The "girls" room was nice and bright and I liked that the accessories and furniture could be easily transitioned to an older girl.  The lamps on the side dressers were acrylic or glass and the butterfly/nature theme seemed easy to update or change with new bedding and wall decor.

These are the butterflies that were on the walls.  They also were a cute idea that would be simple to replicate with fabric scraps.  I'm not sure how they were held onto the wall (mental note to check such things next time I see an idea I like.) I think maybe some Velcro type dot or some 3M product that sticks temporarily might work.  These would also be cute for a mobile or attached to a sheer curtain.
Pottery Barn has a paper stick on option that might also be copied using a stencil and craft paper or scrapbook paper.

 The other bedroom had the large bed turned sideways with no head or foot board.  At first I thought this was weird because it was too big to look like a "daybed" but when I thought that a teenage boy might sleep there and their growing limbs and video game playing habits might make a headboard or foot board superfluous, it looked like a good way to save on floor space.

I liked these lamps because (though they are filled with sand and nests with eggs that I found odd for a "boys" room) they could be used in many rooms with different themes if you filled them with different interesting objects or changed them out for seasonal items or even pictures. Click HERE for a similar lamp.


This was just an interesting idea.  It looks like paper cutouts of some kind on a navy blue background but could be duplicated with fabric or paper doilies or some other lightweight craft objects on any color background and used for a bigger "art" piece in a hall or bathroom.  The cost would be mostly for the frame and some paper to back it with (possibly wrapping paper.)

Here is an example of a different but similar idea. Click HERE for the tutorial.
Framed doilies - after


Thursday, December 22, 2011

"Extra Holiday- Ham & Cheese Pasta"

Sorry for the small picture, I forgot to take one and there was barely any left to photograph. :)


Ingredients

1 lb shell pasta
1/2 block of cream cheese
salt
pepper
3 cloves garlic chopped
1 1/2 cups frozen peas
2 cups milk
1/2 c cheddar cheese
1 -2 tsp dried basil
leftover ham (about 4 good size slices just eyeball it for the amount you want and chop it up the size of the pasta)

1) boil water for pasta
2) saute garlic in large pan for 1-2 minutes.
add milk about 2 pinches of salt, 8-10 grinds of pepper, basil,  and cream cheese.  Stir on medium-low heat until the  cream cheese seems melted in.
3) Cook pasta
4) add in ham and peas, let simmer on low for about 5 minutes.
5) drain pasta and add it to the sauce (if your pan isn't big enough transfer to a big serving bowl/dish
6) add cheddar and stir to melt in.

Serves 6 adults depending on portion size, goes a lot further if you have little kids eating. :)

LinkWithin

Related Posts Plugin for WordPress, Blogger...